Do you want to change the style of the WordPress comment form on your website?
Comments play an important role in building user engagement on a website. A good-looking user-friendly comment form encourages users to participate in the discussion.
In this article, we’ll show you how to easily style the WordPress comment form to boost engagement on your website.

Before Getting Started
WordPress themes control the appearance of your website. Each WordPress theme comes with several files including template files, functions file, JavaScripts, and stylesheets.
Stylesheets contain the CSS rules for all elements used by your WordPress theme. You can add your own custom CSS to override your theme’s style rules.
If you haven’t done this before, then see our article on how to add custom CSS in WordPress for beginners.
Apart from CSS, you may also need to add some functions to modify the default appearance of your WordPress comment form. If you haven’t done this before, then please see our article on how to copy and paste code in WordPress.
That being said, let’s take a look at how to style the WordPress comment form.
Since this is a fairly comprehensive guide, we have created a table of content for easy navigation:
- Styling WordPress Comment Form Using SeedProd Theme Builder
- Change WordPress Comments with Default CSS Classes
- Adding Social Login to WordPress Comments
- Adding Comment Policy Text in WordPress Comment Form
- Move Comment Text Field to Bottom
- Remove Website (URL) Field from WordPress Comment Form
- Add a Subscribe to Comments Checkbox in WordPress
- Add Custom Fields to WordPress Comment Form
Styling WordPress Comment Form Using SeedProd Theme Builder
This method requires SeedProd which is the best WordPress page and theme builder plugin on the market.
It is recommended for beginners with no coding experience. However, the downside of this method is that it will replace your existing WordPress theme with a custom theme.
First, you need to install and activate the SeedProd plugin. For more details, see our step-by-step guide on how to install a WordPress plugin.
Note: You’ll need at least the PRO plan to access the theme builder feature.
Upon activation, you’ll need to create templates for your custom WordPress theme. SeedProd allows you to easily generate these templates using one of their built-in themes.
For detailed instructions, see our tutorial on how to create a custom WordPress theme without coding.
Once you have generated your theme templates, you need to edit Single Post template.

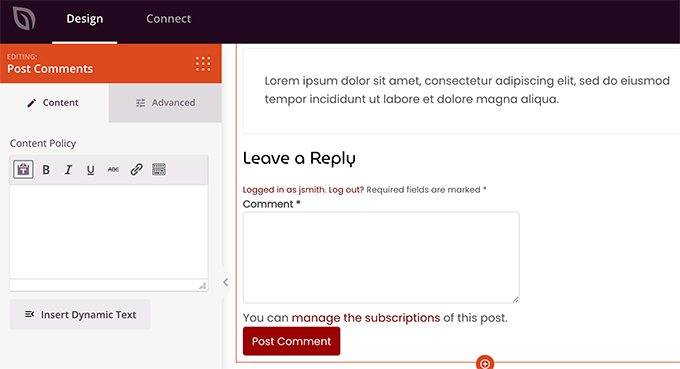
This will load the single post preview in the SeedProd theme builder interface. You’ll notice the comment form block at the bottom of the preview.

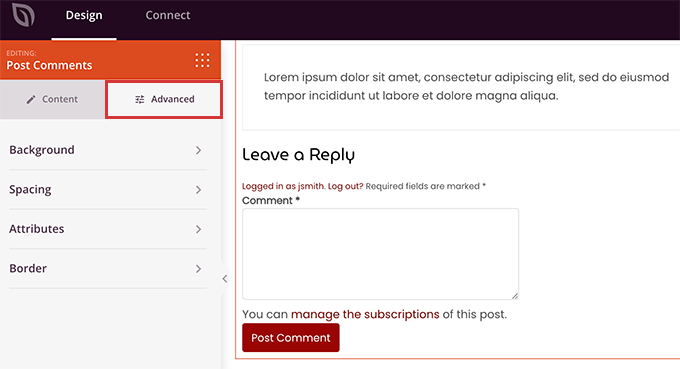
Simply click on the comment form and you will see its properties in the left panel.
From here, you can add a comment note or privacy policy, you can also switch to the Advanced tab to edit comment form style without writing any CSS code.

Once you are finished, don’t forget to click on the Save button to publish your changes.
SeedProd makes it super easy to change the style of any element on your website without writing code.
However, it is a theme builder and you may already be using a WordPress theme that you like. In that case, the following tips will help you manually change comment form styles in WordPress.
Changing Comment Form Style in WordPress
Inside most WordPress themes there is a template called comments.php. This file is used to display comments and comment forms on your blog posts. The WordPress comment form is generated by using the function: <?php comment_form(); ?>.
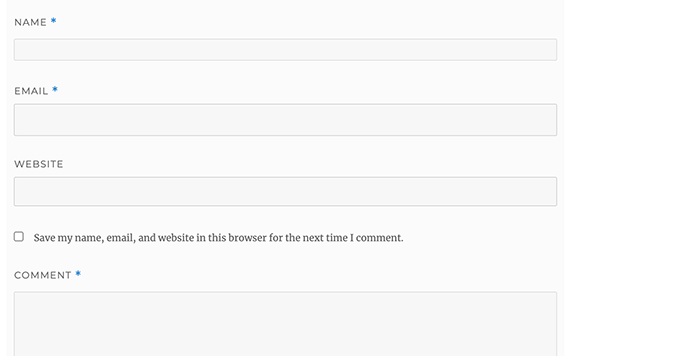
By default, this function generates your comment form with three text fields (Name, Email, and Website), a textarea field for the comment text, a checkbox for GDPR compliance, and the submit button.
You can easily modify each of these fields by simply tweaking the default CSS classes. Below is a list of the default CSS classes that WordPress adds to each comment form.
#respond { }
#reply-title { }
#cancel-comment-reply-link { }
#commentform { }
#author { }
#email { }
#url { }
#comment
#submit
.comment-notes { }
.required { }
.comment-form-author { }
.comment-form-email { }
.comment-form-url { }
.comment-form-comment { }
.comment-form-cookies-consent { }
.form-allowed-tags { }
.form-submit
By simply tweaking these CSS classes, you can completely change the look and feel of your WordPress comment form.
Let’s go ahead and try to change a few things, so you can get a good idea on how this works.
First, we will start by highlighting the active form field. Highlighting the currently active field makes your form more accessible for people with special needs, and it also makes your comment form look nicer on smaller devices.
#respond {
background: #fbfbfb;
padding:0 10px 0 10px;
}

/* Highlight active form field */

#respond input[type=text], textarea {
  -webkit-transition: all 0.30s ease-in-out;
  -moz-transition: all 0.30s ease-in-out;
  -ms-transition: all 0.30s ease-in-out;
  -o-transition: all 0.30s ease-in-out;
  outline: none;
  padding: 3px 0px 3px 3px;
  margin: 5px 1px 3px 0px;
  border: 1px solid #DDDDDD;
}

#respond input[type=text]:focus,
input[type=email]:focus,
input[type=url]:focus,
textarea:focus {
box-shadow: 0 0 5px rgba(81, 203, 238, 1);
margin: 5px 1px 3px 0px;
border: 2px solid rgba(81, 203, 238, 1);
}
This is how our form looked like in the WordPress Twenty Sixteen theme after the changes:

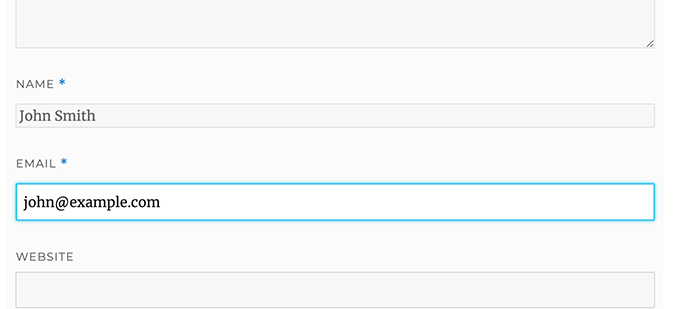
Using these classes, you can change the behavior of how text appears inside input boxes. We will go ahead and change the text style of the author name and the URL fields.
#author, #email {
font-family: "Open Sans", "Droid Sans", Arial;
font-style:italic;
color:#1d1d1d;
letter-spacing:.1em;
}

#url  {
color: #1d1d1d;
font-family: "Luicida Console", "Courier New", "Courier", monospace;
}
If you take a close look in the screenshot below, the name and email field font is different than the website URL.

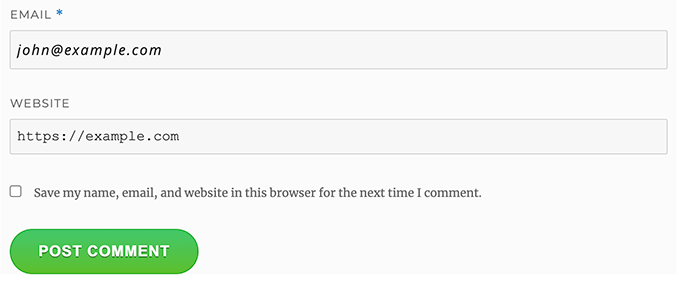
You can also change the style of the WordPress comment form submit button. Instead of using the default submit button, let’s give it some CSS3 gradient and box-shadow.
#submit {
background:-moz-linear-gradient(top, #44c767 5%, #5cbf2a 100%);
background:-webkit-linear-gradient(top, #44c767 5%, #5cbf2a 100%);
background:-o-linear-gradient(top, #44c767 5%, #5cbf2a 100%);
background:-ms-linear-gradient(top, #44c767 5%, #5cbf2a 100%);
background:linear-gradient(to bottom, #44c767 5%, #5cbf2a 100%);
background-color:#44c767;
-moz-border-radius:28px;
-webkit-border-radius:28px;
border-radius:28px;
border:1px solid #18ab29;
display:inline-block;
cursor:pointer;
color:#ffffff;
font-family:Arial;
font-size:17px;
padding:16px 31px;
text-decoration:none;
text-shadow:0px 1px 0px #2f6627;
}

#submit:hover {
background:-webkit-gradient(linear, left top, left bottom, color-stop(0.05, #5cbf2a), color-stop(1, #44c767));
background:-moz-linear-gradient(top, #5cbf2a 5%, #44c767 100%);
background:-webkit-linear-gradient(top, #5cbf2a 5%, #44c767 100%);
background:-o-linear-gradient(top, #5cbf2a 5%, #44c767 100%);
background:-ms-linear-gradient(top, #5cbf2a 5%, #44c767 100%);
background:linear-gradient(to bottom, #5cbf2a 5%, #44c767 100%);
background-color:#5cbf2a;
}
#submit:active {
position:relative;
top:1px;
}

Taking WordPress Comment Forms to the Next Level
You might be thinking that was too basic. Well, we have to start there, so everyone can follow along.
You can take your WordPress comment form to the next level by rearranging form fields, adding social login, comment subscriptions, comment guidelines, quicktags, and more.
Add Social Login to WordPress Comments
Let’s start with adding social logins to WordPress comments.
The first thing you need to do is install and activate the Super Socializer plugin. For more details, see our step by step guide on how to install a WordPress plugin.
Upon activation, you need to visit Super Socializer » Social Login and then check the box that says ‘Enable Social Login’.

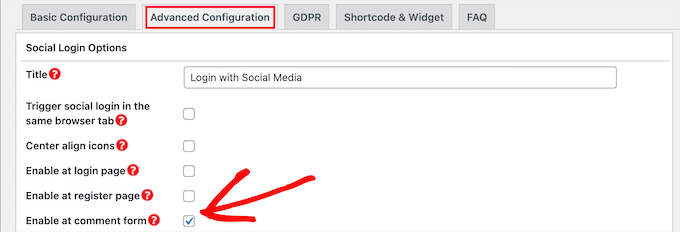
This brings up the social login options panel. First, click the ‘Advanced Configuration’. tab
Then, make sure the ‘Enable at comment form’ box is checked.

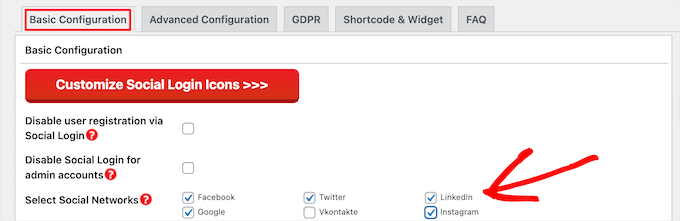
Next, click the ‘Basic Configuration’ tab. Here, you can choose the social networks you want to add by checking the boxes in the ‘Select Social Networks’ section.

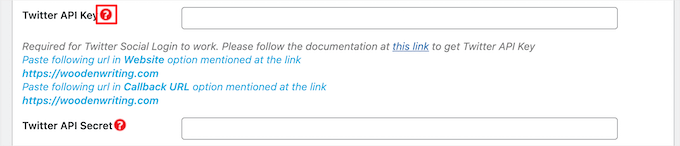
Below this, the plugin will require API keys in order to connect with social platforms. Simply click on the ‘Question Mark’ icon to bring up the instructions on how to get this for each platform.

Once you’re done, click the ‘Save Changes’ button to save your social login settings.
You can now visit your website to see the social login buttons above your comment form.

Adding Comment Policy Text Before or After Comment Form
We love all of our users, and we really appreciate them taking a few minutes to leave a comment on our site. However, to create a healthy discussion environment it is important to moderate comments.
To have full transparency, we created a comment policy page, but you can’t just put this link in the footer.
We wanted to have our comment policy be prominent and visible for all users who are leaving a comment. This is why we decided to add the comment policy in our WordPress comment form.
If you want to add a comment policy page, then the first thing you need to do is create a WordPress page and define your comment policy (you can steal ours and modify it to meet your needs).
After that, you can add the following code in your theme’s functions.php file or a code snippets plugin.
function wpbeginner_comment_text_before($arg) {
    $arg['comment_notes_before'] .= '<p class="comment-policy"">We are glad you have chosen to leave a comment. Please keep in mind that comments are moderated according to our <a href="http://www.example.com/comment-policy-page/">comment policy</a>.</p>';
    return $arg;
}

add_filter('comment_form_defaults', 'wpbeginner_comment_text_before');
The above code will replace the default comment form before notes with this text. We have also added a CSS class in the code, so that we can highlight the notice using CSS. Here is the sample CSS we used:
p.comment-policy {
    border: 1px solid #ffd499;
    background-color: #fff4e5;
    border-radius: 5px;
    padding: 10px;
    margin: 10px 0px 10px 0px;
    font-size: small;
    font-style: italic;
}
This is how it looked on our test site:

If you want to display the link after the comment text area, then use the following code.
function wpbeginner_comment_text_after($arg) {
    $arg['comment_notes_after'] .= '<p class="comment-policy"">We are glad you have chosen to leave a comment. Please keep in mind that comments are moderated according to our <a href="http://www.example.com/comment-policy-page/">comment policy</a>.</p>';
    return $arg;
}

add_filter('comment_form_defaults', 'wpbeginner_comment_text_after');
Don’t forget to change the URL accordingly, so it goes to your comment policy page rather than example.com.
Move Comment Text Field to Bottom
By default, the WordPress comment form displays the comment text area first and then the name, email, and website fields. This change was introduced in WordPress 4.4.
Before that, WordPress websites displayed name, email, and website fields first, and then the comment text box. We felt that our users are used to seeing the comment form in that order, so we still use the old field order on WPBeginner.
If you want to do that, then all you need to do is add the following code to your theme’s functions.php file or a code snippets plugin.
function wpb_move_comment_field_to_bottom( $fields ) {
$comment_field = $fields['comment'];
unset( $fields['comment'] );
$fields['comment'] = $comment_field;
return $fields;
}

add_filter( 'comment_form_fields', 'wpb_move_comment_field_to_bottom');
We always recommend adding code in WordPress using a code snippets plugin like WPCode. This makes it easy to add custom code without editing your functions.php file, so you don’t need to worry about breaking your site.
To get started, you need to install and activate the free WPCode plugin. For instructions, see this guide on how to install a WordPress plugin.
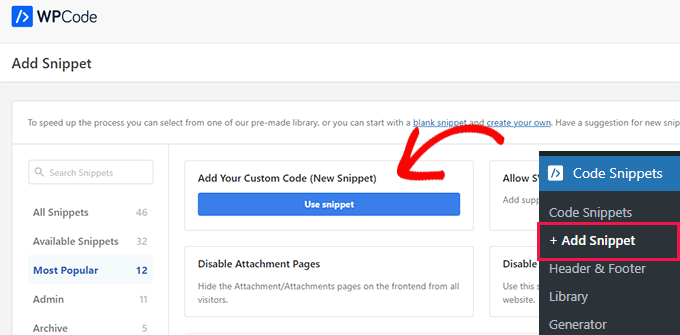
Upon activation, go to Code Snippets » + Add Snippet from the WordPress dashboard.
From there, find the ‘Add Your Custom Code (New Snippet)’ option and click the ‘Use Snippet’ button underneath it.

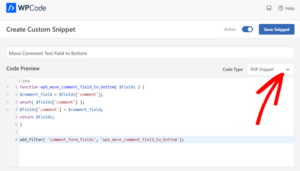
Next, add a title for your snippet at the top of the page, this can be anything to help you remember what the code is for.
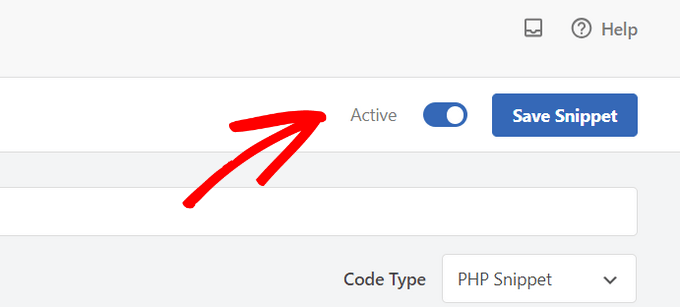
Then, paste the code from above into the ‘Code Preview’ box and choose ‘PHP Snippet’ as the code type from the dropdown list on the right.

After that, simply toggle the switch from ‘Inactive’ to ‘Active’ and click the ‘Save Snippet’ button.

This code simply moves the comment text area field to the bottom.

Remove Website (URL) Field from WordPress Comment Form
The website field in the comment form attracts a lot of spammers. While removing it won’t stop spammers or even reduce spam comments, it will certainly save you from accidentally approving a comment with bad author website link.
It will also reduce a field from the comment form, making it easier and more user-friendly. For more on this topic, see our article on removing website url field from WordPress comment form.
To remove URL field from comment form, simply add the following code to your functions.php file or a code snippets plugin.
function wpbeginner_remove_comment_url($arg) {
    $arg['url'] = '';
    return $arg;
}
add_filter('comment_form_default_fields', 'wpbeginner_remove_comment_url');

You can follow the same steps in the previous section to safely add this code in WordPress using the WPCode plugin.
Add a Subscribe to Comments Checkbox in WordPress
When users leave a comment on your website, they might want to follow up on that thread to see if someone has replied to their comment. By adding a subscribe to comments checkbox, you enable users to receive instant notifications whenever a new comment appears on the post.
To add this checkbox, the first thing you need to do is install and activate Subscribe to Comments Reloaded plugin. Upon activation, you need to visit StCR » Comment Form page to configure the plugin settings.

For detailed step-by-step instructions, see our article on how to allow users to subscribe to comments in WordPress.
Add Extra Fields to WordPress Comment Form
Want to add extra fields to your WordPress comment form? For instance, an optional field where users can add their Twitter handle?
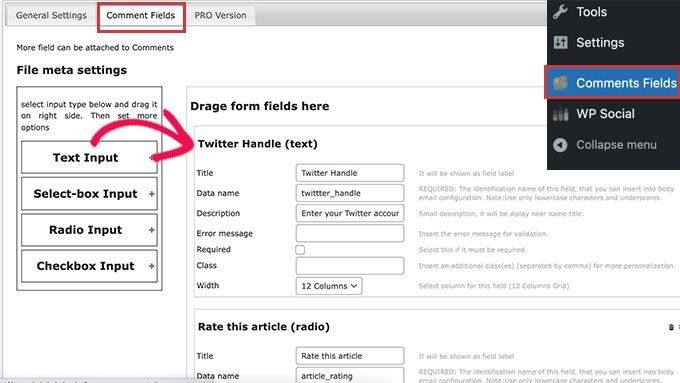
Simply install and activate the WordPress Comments Fields plugin. Upon activation, go to the ‘Comments Fields’ page and switch to the ‘Comment Fields’ tab.

Simply drag and drop a custom field and give it a title, description, and data name.
Once you are done adding the fields, don’t forget to click on the ‘Save all changes’ button.
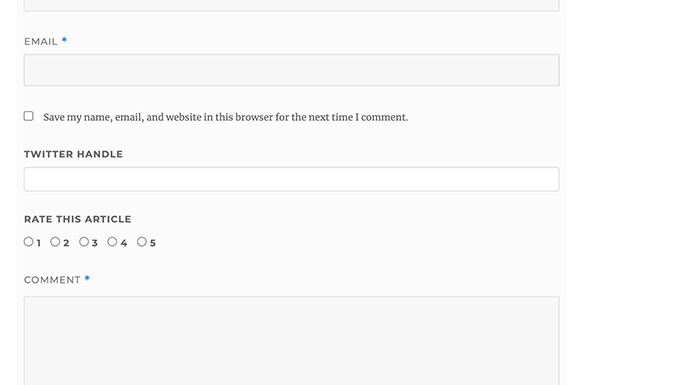
You can now view your comment form to see the custom fields in actions.

The custom fields are then displayed in comment moderation and below the comment content.

For more details, see our tutorial on how to add custom fields to the comment form in WordPress.
We hope this article helped you learn how to style WordPress comment form to make it more fun for your users. You may also want to see our tips to get more comments on your WordPress blog posts and our expert picks of the best social media plugins for WordPress.
If you liked this article, then please subscribe to our YouTube Channel for WordPress video tutorials. You can also find us on Twitter and Facebook.

